
So, you've built a machine learning model. It performs beautifully in your Jupyter Notebook, and the accuracy metrics are off the charts. That’s a huge win, but what comes next is often the real challenge: moving that model from the safety of your local environment into a live production system where it can actually start delivering value.
This process is all about packaging your model, setting up a way to serve it (like an API), and making sure the whole system is reliable and can handle real-world traffic. It's the critical step that transforms a brilliant algorithm into a business workhorse.
From Notebook To Production: The Real ML Challenge
It's a story most data scientists have lived through. You spend weeks, maybe months, meticulously training a model. The moment it hits that stellar accuracy on your test data feels like a major victory. But too often, that's where the journey stalls. The model becomes a powerful engine with nowhere to go, stuck in a development environment.
The true test isn’t just building a great predictive model; it's bridging the vast gap between the lab and the real world. This is where data science meets the nitty-gritty of software engineering, a discipline we now call MLOps (Machine Learning Operations). It’s about turning a static model file into a dynamic, value-generating asset.
Why Deployment Is More Than Just Shipping Code
Getting a model into production forces you to think beyond notebook cells and consider the entire lifecycle. We're talking about managing dependencies, handling live traffic, monitoring for performance decay, and building automated pipelines for future updates. It's about creating a system that is robust, reproducible, and ready to scale.
The industry data backs this up. While a huge 85% of organizations are dabbling in machine learning, only a small fraction—around 20%—actually manage to get their models into production successfully. You can read more about these deployment statistics to see the full picture. That gap highlights a simple truth: deployment isn't an afterthought; it’s a strategy.
The real difficulty is that a model isn’t just an algorithm. It's a living system of code, data, dependencies, and infrastructure. All these parts have to work together flawlessly. Without a solid deployment plan, even the most accurate model is little more than a research project.
Thinking about production from day one changes everything. It forces you to build models that are not just accurate, but also resilient and maintainable.
Core Tenets of a Production-Ready ML Strategy
To make the leap from an experimental project to an enterprise-grade solution, your strategy needs to be built on a few core principles. These aren't just buzzwords; they are the practical pillars that separate successful deployments from those that fail.
| Principle | Why It Matters for Production |
|---|---|
| Reproducibility | You need to be able to rebuild and deploy the exact same model every single time. This eliminates the "it worked on my machine" headache. |
| Automation | This is your best defense against manual errors. Automation speeds up the deployment cycle and frees up your team to improve models, not manage servers. |
| Scalability | Your system must handle real-world demand, whether it's ten requests or ten million. It needs to perform reliably under fluctuating loads. |
| Monitoring | You need eyes on your model's health. Monitoring helps you catch issues like data drift or concept drift before they impact the business. |
In the end, learning how to properly deploy a machine learning model is what separates a proof-of-concept from a tool that genuinely drives business outcomes. This guide is designed to give you a clear roadmap for navigating this complex but incredibly rewarding process.
A model you've trained in a Jupyter Notebook is a bit like a concept car—it looks amazing and is packed with potential, but it's nowhere near ready for the unpredictable conditions of the open road. To successfully deploy a machine learning model, you have to get it out of that pristine, experimental environment and into a structure that can handle the harsh realities of production. This transition is less about tweaking algorithms and more about applying solid software engineering practices.
The very first, non-negotiable step is to rescue your code from the notebook. I love notebooks for exploration and quick visualizations, but they are notoriously difficult to version, test, and maintain in a team setting. Your goal is to refactor the core logic—your preprocessing steps, the prediction function, and any post-processing—into clean, modular Python scripts. Think of it as disassembling your beautiful prototype to rebuild it on a reliable, production-grade assembly line.
This refactoring isn't just busywork. It’s a foundational practice for creating dependable systems. When each component is separate, you can test and update it independently without the risk of breaking the entire application.
From Notebook Cells To Python Scripts
Before you write a single line of refactored code, start by organizing your project into a logical directory structure. This simple act brings immediate clarity and makes your project understandable to others (and, let's be honest, to your future self).
A typical, battle-tested layout I often use looks something like this:
- /my_model
- /app: This is where your API logic lives (e.g., a
main.pyfor a FastAPI service). - /models: A dedicated spot for your serialized model artifact (e.g.,
model.joblib). - /scripts: Holds any helper scripts for training, evaluation, or other one-off tasks.
requirements.txt: The master list of every single project dependency.Dockerfile: The recipe for building your container image.
- /app: This is where your API logic lives (e.g., a
This structure cleanly separates concerns, making it far easier to manage code, model artifacts, and configurations as your project grows. It’s the first real step toward treating your ML project like a legitimate software product. And if you find yourself managing a whole fleet of models, it's worth exploring more robust AI model management strategies to build a scalable framework for versioning and governance.
Serializing Your Model and Dependencies
With your code organized, it's time to package the trained model itself. This process, known as serialization, converts your in-memory model object into a file that can be saved to disk and loaded later in a completely different environment.
For most Python-based models, the go-to tools are pickle and joblib. While pickle is built-in, I almost always lean on joblib because it’s much more efficient with the large NumPy arrays that are so common in machine learning.
Here’s a quick look at how you'd save a trained scikit-learn model:
import joblib
from sklearn.ensemble import RandomForestClassifier
Assume 'model' is your trained classifier
model = RandomForestClassifier()
… your training code would be here …
Save the model to a file inside your 'models' directory
joblib.dump(model, 'models/my_random_forest.joblib')
Just as critical is locking down your environment's dependencies. A production server will almost certainly not have the same packages installed as your local machine, and this mismatch is one of the most common sources of deployment headaches. You absolutely must create a requirements.txt file that lists every package and its exact version.
A model is only as reproducible as its environment. I've seen deployments fail in the most baffling ways, and after hours of debugging, the culprit was a single, unpinned dependency in the
requirements.txtfile. Don't let that be you.
Generating this file is incredibly simple. Just run this command from your project's virtual environment:
pip freeze > requirements.txt
This file is your guarantee that any server—or any teammate—can recreate the exact environment needed to run your model. It eliminates all the guesswork and makes your deployment process deterministic and reliable. Skipping this step is like gambling that the production environment will magically match the one where your model worked perfectly. This simple text file is your insurance policy.
Containerizing Your Model With Docker
Alright, you've got your model serialized and a neat requirements.txt file listing all its dependencies. What's next? It's time to build a self-contained, portable home for your application. This is where Docker comes into play, and frankly, it's a non-negotiable tool for anyone serious about deploying machine learning models.
Docker lets you package everything—your code, your .joblib model file, your dependencies, and even the underlying operating system components—into a single, isolated unit called an image.
This image can then be launched as a container on any machine with Docker installed. Your laptop, a colleague's Mac, a cloud server… it doesn't matter. The environment is guaranteed to be identical everywhere. This is the ultimate fix for the dreaded "but it works on my machine!" problem. For machine learning, this consistency is a lifesaver, as even tiny differences in library versions can throw your model's predictions into chaos.
Writing Your First Dockerfile
The blueprint for a Docker image is a simple text file named Dockerfile. Think of it as a recipe. It contains a series of instructions that Docker follows, layer by layer, to assemble a perfectly configured environment just for your model.
Let's break down the essential commands you'll be using for a typical Python-based ML service:
FROM: This is always your starting point. It specifies the base image you're building on top of. A common choice for Python apps ispython:3.10-slim, which gives you a lean, lightweight foundation.WORKDIR: This sets the working directory inside the container. From here on, all commands will run from this path, which helps keep your project files tidy.COPY: This one is straightforward—it copies files from your local machine into the container's filesystem. You’ll use it to bring in yourapp.py,requirements.txt, and of course, your serialized model.RUN: This command executes shell commands during the build process. Its most frequent job is installing all the Python libraries listed in yourrequirements.txtusing pip.CMD: This defines the default command to execute when a container starts. For an API, this is typically the command to launch your web server, likegunicornoruvicorn.
These five commands are the backbone of your deployment package, creating a reproducible environment that you can trust.
A Real-World Dockerfile Example
Theory is one thing, but seeing it in action is what makes it all click. Let's imagine we have a simple Flask API in a file named app.py. This app loads our random_forest.joblib model and serves predictions.
Here’s what a practical, production-ready Dockerfile for that project would look like:
Start from a lightweight Python base image
FROM python:3.10-slim
Set the working directory inside the container
WORKDIR /app
Copy the dependency file first to leverage Docker's layer caching
COPY requirements.txt requirements.txt
Install the Python dependencies
RUN pip install –no-cache-dir -r requirements.txt
Copy the rest of the application code into the container
COPY . .
Expose the port the app runs on
EXPOSE 8000
Define the command to run the application
CMD ["gunicorn", "–bind", "0.0.0.0:8000", "app:app"]
Pro Tip: Did you notice that
requirements.txtis copied and installed before the rest of the code? That's a classic optimization trick. Your dependencies change far less often than your application code. By splitting them up, Docker can cache the dependency layer. The next time you build, ifrequirements.txtis unchanged, Docker reuses the cached layer, making your build significantly faster.
With this Dockerfile sitting in your project's root directory, building your image is as simple as running a single command: docker build -t my-model-api .. Just like that, you have a portable, version-controlled artifact that's ready to be deployed anywhere.
Mastering containerization is central to modern MLOps. The field is constantly evolving, with a major focus on automating deployment pipelines and deeply integrating with traditional DevOps workflows. If you want to dive deeper into these trends, you can get more MLOps insights on hatchworks.com. Adopting this approach turns deployment from a one-off, manual task into a robust and repeatable system.
Choosing Your Deployment Strategy
So, you’ve got your model neatly packed inside a Docker container. That’s a huge step, but now you’re at a critical fork in the road. Where exactly will this container live and run? This isn't just a minor detail; the choice you make here will shape how you deploy your machine learning model and have a massive impact on its scalability, cost, and the sanity of your team.
This decision is less about picking a favorite cloud provider and more about selecting a deployment pattern that actually fits your project's needs. You're basically navigating a classic trade-off between control, convenience, and complexity.
The Spectrum of Deployment Options
On one end of the spectrum, you have the fully managed, all-in-one machine learning platforms. I'm talking about services like AWS SageMaker, Google AI Platform, or Azure Machine Learning. These platforms are purpose-built for MLOps, abstracting away almost all the gritty infrastructure details.
You just hand over your containerized model, and the service takes care of the rest—creating the endpoint, handling auto-scaling, and often, even setting up monitoring. It’s a fantastic option for teams that need to ship fast and want to focus on the model, not on managing servers. The trade-off? You might get locked into a specific vendor, and you'll have less fine-grained control over the environment.
At the complete opposite end is the full DIY approach. This means deploying your container to a basic cloud server, like an Amazon EC2 instance or a Google Compute Engine VM. This route gives you absolute, maximum control. You can tweak the OS, configure the networking, and lock down security to your exact specifications.
But all that control comes with a price. You're now on the hook for everything: setting up the web server, applying security patches, building out scaling logic, and configuring monitoring from scratch. It’s definitely more work, but it can be a lot more cost-effective if you have predictable workloads.
Choosing a deployment strategy is like deciding whether to build a house from a blueprint or buy a pre-fabricated home. Building from scratch gives you ultimate customization, but requires deep expertise and effort. A pre-fab home gets you moved in faster, but you’re limited to the manufacturer's designs and configurations.
This decision tree can help you visualize which CI/CD pipeline type might be a better fit based on your project complexity and team size.
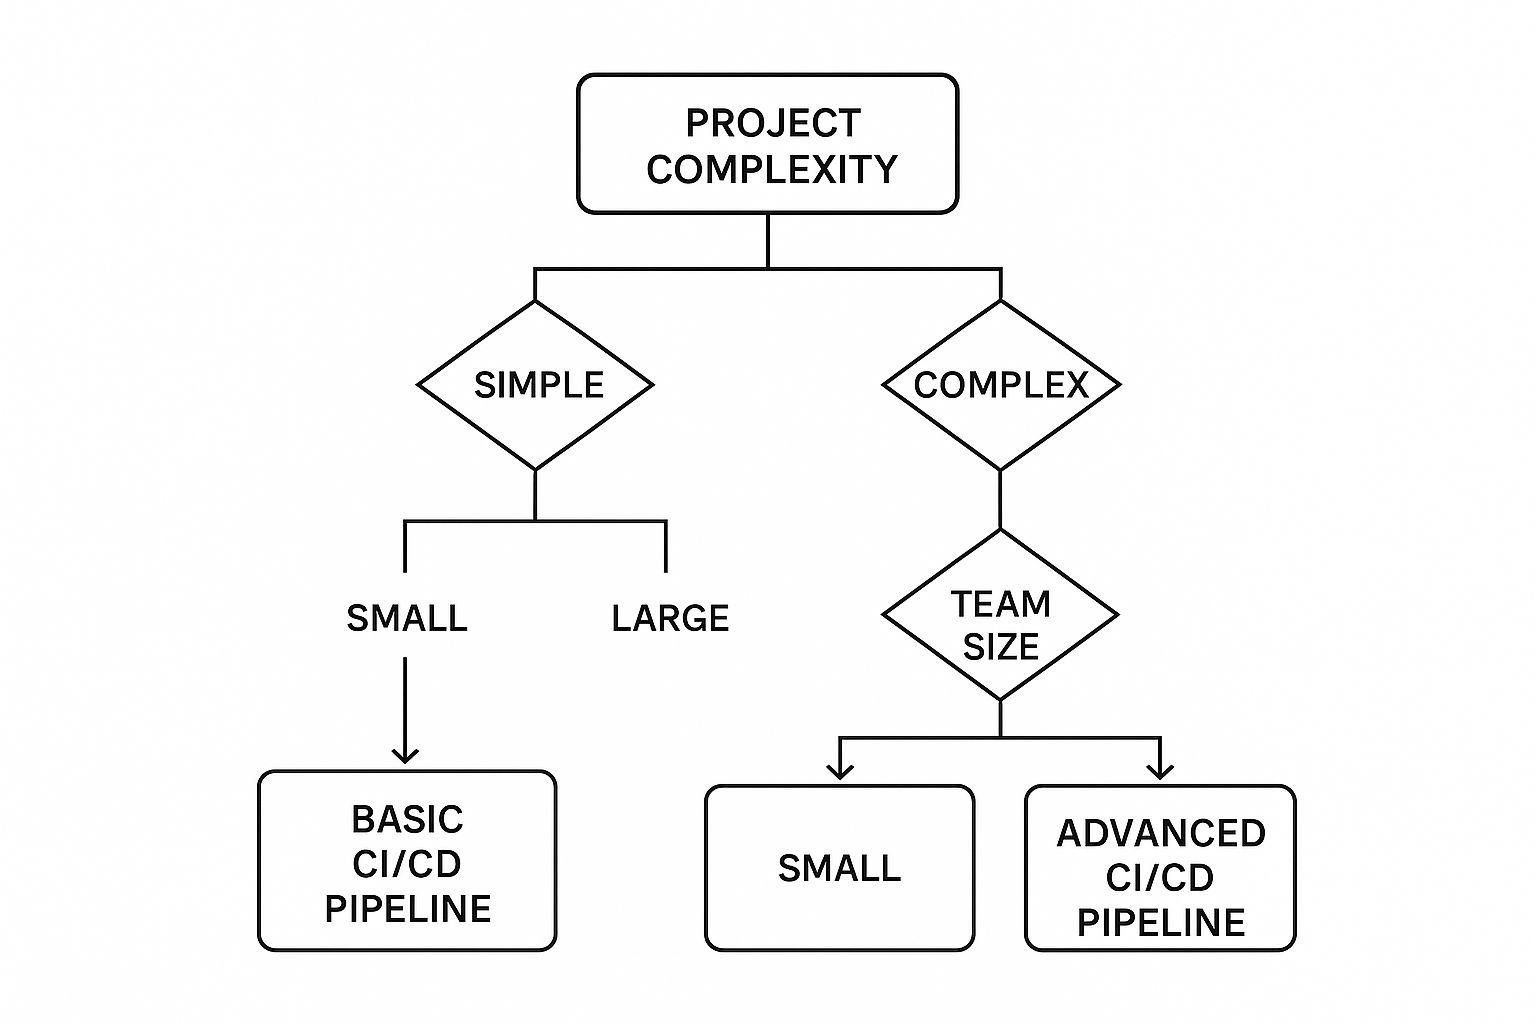
As the infographic shows, simpler projects often do just fine with basic pipelines. But as your projects and teams grow, you'll find that more advanced automation and orchestration become essential.
Kubernetes: The Powerful Middle Ground
What if you need both scalability and control? This is where container orchestration platforms like Kubernetes (or K8s) have become the de facto industry standard. Kubernetes lets you deploy and manage containers at a massive scale, automating things like rollouts, rollbacks, and scaling your application based on real-time demand.
Let's be clear: Kubernetes is a beast. It's incredibly powerful but also notoriously complex. Setting up and managing a K8s cluster yourself is a major undertaking. That's why cloud providers offer managed Kubernetes services like Amazon EKS, Google GKE, and Azure AKS. These services handle the difficult control plane management for you, giving you the flexibility of K8s without the full operational nightmare.
For a deeper look at building automated pipelines, our guide on deploying applications using Jenkins offers some great insights into building robust CI/CD workflows that can feed into these deployment targets.
Making the Right Choice
Deciding on the best home for your model can feel overwhelming. To make it a little easier, I've put together a table comparing the most common options. This should help you weigh the factors that really matter for production systems.
Comparing ML Model Deployment Options
This comparison breaks down popular deployment targets to help you choose the best fit for your project's specific needs—from team expertise to budget constraints.
| Deployment Target | Best For | Scalability | Management Overhead | Typical Cost |
|---|---|---|---|---|
| Managed ML Platform (e.g., SageMaker) | Teams wanting to accelerate deployment and minimize infrastructure management. | Excellent (auto-scaling built-in) | Low | High (Pay-per-prediction can be expensive at scale) |
| Virtual Machine (e.g., EC2) | Small projects, predictable traffic, or when full environment control is necessary. | Manual (Requires manual setup of load balancers and scaling groups) | High | Low (Pay only for the instance uptime) |
| Managed Kubernetes (e.g., EKS, GKE) | Complex applications with multiple microservices needing high availability. | Excellent (Horizontal pod auto-scaling) | Medium | Moderate (Pay for nodes and cluster management fee) |
Ultimately, the right strategy boils down to your team’s expertise, your budget, and how quickly you expect your application to grow. Don't feel pressured to start with the most complex solution. In my experience, starting with a simpler approach and migrating to a more sophisticated one as your needs evolve is often the wisest path forward.
Automating Deployments With CI/CD Pipelines

Let’s be honest: manually pushing a new model version into production is terrifying. It’s a process riddled with checklists, late-night monitoring, and the constant fear of human error. This old-school approach just doesn't scale and quickly becomes a major bottleneck. To deploy a machine learning model reliably and efficiently, you have to embrace automation.
This is exactly where a CI/CD pipeline becomes your best friend. Standing for Continuous Integration and Continuous Deployment (or Delivery), CI/CD automates all the steps needed to get your code from a Git commit into a live production environment. For MLOps, it’s the engine that powers fast, dependable, and repeatable deployments.
The core idea is refreshingly simple. Every time you push a change to your code repository, a series of automated actions kicks off. This builds a resilient MLOps foundation that transforms fragile, one-off deployments into a streamlined, factory-like process for releasing model updates.
What A CI/CD Pipeline Actually Does
So what does this look like in practice? Imagine you’ve just tweaked your model's preprocessing logic. Instead of SSH-ing into a server and manually pulling updates, you just push your changes to your Git repository. That one action sets the entire pipeline in motion.
A typical CI/CD workflow for a machine learning model breaks down into a few key stages:
- Trigger on Commit: The whole thing starts automatically when new code is pushed to a specific branch in your Git repo, like
mainordevelop. - Run Automated Tests: First, the pipeline runs your full suite of tests. This should include unit tests for your code and validation tests for your model to catch any regressions before they get anywhere near production.
- Build a Fresh Docker Image: If the tests all pass, the pipeline builds a new Docker image from your Dockerfile. This packages up your updated code, the model artifact, and all its dependencies into a neat, self-contained unit.
- Push to a Container Registry: The newly built and tagged image gets pushed to a secure container registry. Think Docker Hub, AWS ECR, or Google Artifact Registry.
- Deploy to Production: Finally, the pipeline signals your deployment target—whether it's a Kubernetes cluster or a cloud VM—to pull the new image and roll out the update.
This automated flow dramatically cuts down the risk of deployment errors and lets your team iterate at a much faster pace.
The Tools of the Automation Trade
The good news is you don't need to build this automation from the ground up. Several powerful tools are designed to manage these workflows for you.
GitHub Actions is an incredibly popular choice because it integrates directly into your repository, making it ridiculously easy to get started. Jenkins is another powerhouse, offering immense flexibility and a vast ecosystem of plugins, though it usually demands more initial setup.
Other excellent options include GitLab CI/CD, CircleCI, and cloud-native solutions like AWS CodePipeline. Honestly, the specific tool you choose is less important than the principle of adopting an automated, Git-driven workflow.
The real value of a CI/CD pipeline isn't just speed; it's confidence. When your deployment process is automated and tested, you gain the freedom to make changes and release improvements without the fear of breaking your entire system. It shifts the focus from deploying models to improving them.
This operational focus is being mirrored by the industry at large. Worldwide spending on AI solutions is on track to blow past $500 billion by 2027, with big firms planning to put over 40% of their IT budgets toward AI projects. You can learn more about AI spending trends and see for yourself how deployment is becoming a critical area of investment.
Adopting robust automation isn’t a luxury anymore; it’s a competitive necessity. For a deeper dive into building a strong operational framework, check out our guide on MLOps best practices.
Got Questions About Model Deployment?
As you start putting theory into practice, you'll find a lot of specific questions pop up. It's one thing to understand the fundamentals of packaging and serving a model, but it's another thing entirely to navigate the real-world trade-offs and pick the right tools for your specific situation. This section is here to tackle some of the most common questions that come up when you deploy your first machine learning model.
Think of this as the practical advice you'd get from a senior engineer after your first few deployment attempts—clear, direct answers to help you bridge the gap between knowing the steps and executing them with confidence.
What's the Easiest Way to Deploy a Personal Project?
For smaller, personal projects or when you're just building a proof-of-concept, you absolutely do not need to fire up a full-blown Kubernetes cluster. In fact, that's often a mistake. The real goal here is speed and simplicity, and thankfully, there are amazing platforms designed for just that.
Platforms like Heroku or Streamlit Cloud are fantastic starting points. They’re built to abstract away most of the underlying infrastructure headaches. You can often deploy an app directly from a GitHub repository with just a few clicks and a simple configuration file. They handle the server provisioning, networking, and even basic scaling for you, letting you focus entirely on your code.
For instance, with Streamlit Cloud, you can turn a data script into a shareable web app in a matter of minutes. It's an excellent way to show off what your model can do without getting bogged down in server management.
The best deployment tool is the one that matches the scale of your problem. Over-engineering a small project is a common mistake that burns time and energy. Start simple, and only add complexity when your project's needs actually demand it.
This approach gets you a live URL for your model quickly, which is incredibly motivating and perfect for sharing your work. You can always migrate to a more robust solution later if the project takes off.
How Do I Keep an Eye on a Model in Production?
Once your model is live, your job isn't over—it’s just entered a new phase. You can't just deploy and forget. You need to actively monitor its performance from two critical angles: system health and model quality.
System health is all about the operational side of your service. You should be tracking key metrics such as:
- Latency: How long does it take for your API to return a prediction?
- Throughput: How many requests per second can your service handle?
- Error Rate: What percentage of requests are failing?
- Resource Utilization: How much CPU and memory is your service chewing up?
For these system-level metrics, tools like Prometheus (for collecting time-series data) and Grafana (for creating dashboards) are the undisputed industry standard. They give you a real-time pulse on your service's operational stability.
Model quality, however, is a completely different beast. A model can be running perfectly from a system perspective—low latency, zero errors—but still be churning out garbage predictions. This is where you need to watch out for things like data drift, where the input data in production starts to look wildly different from the data the model was trained on.
You also need to track prediction accuracy over time, which often requires building a feedback loop to get ground-truth labels for your live predictions. This is where specialized MLOps monitoring platforms like Fiddler AI, Arize, or WhyLabs really shine. They are built specifically to tackle these model-centric problems, helping you catch subtle performance issues before they silently impact your business.
What’s the Difference Between Deployment and Serving?
People often use 'model deployment' and 'model serving' as if they mean the same thing, but they actually refer to distinct parts of the process. Getting this straight helps clarify what you're actually trying to build.
Let's use an analogy: opening a new restaurant.
Model Deployment is the entire end-to-end process. It’s everything you do to get ready for opening night. It’s finding the location (choosing infrastructure), designing the kitchen (containerization), writing the menu (creating the API), hiring staff (setting up CI/CD), and stocking the pantry (managing dependencies). Deployment is the whole strategic operation of getting your model from a notebook into a live, production-ready state.
Model Serving, on the other hand, is the specific action of the kitchen being open and taking orders. It’s the active component—usually an API endpoint—that is running, listening for incoming requests, and returning predictions in real time. It’s the 'inference server' that executes your model's logic.
In short, deployment is the process of setting everything up, while serving is the runtime component that actually does the work. You deploy a model so that it can be served.
At DATA-NIZANT, we are committed to providing expert-authored articles that break down complex data science and AI topics into actionable, in-depth guides. Explore our knowledge hub to stay ahead of emerging trends and master the skills needed for success. Learn more at https://www.datanizant.com.

