
How to Fine Tune LLM: Unlock Powerful AI Customization (2024)
Why Generic Models Miss the Mark for Real Business Problems
Here’s a common scenario every AI team eventually faces: the impressive, general-purpose large language model that aced every demo falls flat when faced with your specific business challenges. It’s a frustrating but predictable discovery. These foundational models, trained on the vast expanse of the public internet, are like a polyglot who knows a little about everything but is fluent in nothing specific. They lack the specialized vocabulary, context, and nuanced understanding required for domain-specific tasks, whether in finance, healthcare, or legal services.
Forcing a generic model to handle a specialized workflow is like asking a general practice doctor to perform open-heart surgery. They understand the basics of human anatomy, but they lack the deep, specific knowledge and practiced skill to succeed. The model might generate responses that are grammatically correct but factually wrong, tonally inappropriate, or completely miss the procedural context of your industry. This gap between general knowledge and specific application is where many AI projects lose momentum and stakeholder buy-in.
The Language of Your Business
The core issue is that pre-trained models don’t speak your company’s unique language. They don't know your internal acronyms, the subtleties of your customer support conversations, or the required structure for your technical documentation. This is where learning how to fine tune llm becomes not just a technical exercise, but a strategic necessity. Fine-tuning bridges this critical gap, teaching the model the specific "dialect" of your business. It transforms the AI from a generalist into a specialist that understands your world.
One of the foundational aspects of fine-tuning large language models is starting with a clearly defined task. This initial step directs the model toward a specific goal, which makes performance benchmarks measurable. The process builds upon pre-trained models that have already absorbed diverse language usage from massive datasets. This approach saves immense computational resources and time, allowing the fine-tuning process to zero in on domain-specific nuances that improve model accuracy for specialized tasks. You can explore a deeper dive into this initial lifecycle and find out more about fine-tuning LLMs on SuperAnnotate.
The following chart illustrates how a model’s performance on a specific task, like sentiment analysis, can dramatically improve post-fine-tuning.

This visual underscores a key takeaway: fine-tuning with targeted, high-quality data directly translates to better, more reliable outcomes on specialized tasks.
Beyond Metrics: Building Trust and Delivering Value
Ultimately, successful fine-tuning isn't just about boosting accuracy percentages on a dashboard. It’s about creating an AI tool that your team can trust and that delivers real, tangible business outcomes. When a model consistently generates outputs that align with your company’s voice, adhere to complex instructions, and correctly interpret niche terminology, it becomes an invaluable asset. This is how you move from a cool tech demo to a business-critical application that makes believers out of even the most skeptical stakeholders. The investment in customization pays off by producing an AI that truly works for you.
Building Your Fine-Tuning Environment Without Breaking the Bank
Getting started with fine-tuning can seem intimidating, especially when you read about the huge GPU farms used for training foundation models. But here's a practical tip from the trenches: setting up an environment to learn how to fine tune llm is much more achievable than you might imagine. It’s less about owning the most powerful hardware and more about making smart choices that balance your budget and performance needs.
Your first big decision is whether to go with a cloud setup or a local machine. For many, particularly those just dipping their toes in, cloud platforms like Google Colab, AWS SageMaker, or Azure Machine Learning are excellent starting points. They handle all the hardware maintenance and give you instant access to powerful GPUs on a pay-as-you-go model. This is ideal for initial experiments and smaller projects where the upfront cost of a dedicated rig would be a major blocker.
On the other hand, if fine-tuning becomes a daily, core activity for your team, those cloud service bills can start to climb. This is the point where investing in a dedicated local machine with a couple of strong GPUs, like the NVIDIA RTX series, begins to make a lot of financial sense. While the initial cost might be a few thousand dollars, it can quickly pay for itself over a few months when compared to hourly cloud GPU fees.
Choosing Your Platform and Tools
After picking between cloud and local, the next crucial move is to create a reproducible software environment. I can't stress this enough—it's vital for teamwork and getting consistent results from your experiments. Using tools like Docker or Conda lets you build isolated environments. Here, you can lock in specific versions of Python, PyTorch or TensorFlow, and key libraries like Hugging Face Transformers and Datasets. This practice helps you sidestep the classic "but it works on my machine!" headache.
The tools you select will shape your entire workflow. The Hugging Face ecosystem, for instance, is the go-to for many, and for good reason. It offers more than just pre-trained models; it provides high-level tools like the Trainer API, which handles much of the tedious code needed for training loops, optimizers, and learning rate schedulers. This lets you concentrate on what matters most: your data and the model, not the underlying plumbing.
Take a look at a typical training script using the Hugging Face Trainer API. It really tidies up the whole process.

This screenshot shows how you can define your training arguments and set up a Trainer object with just a few lines of code, highlighting how efficient established frameworks can be.
A Practical Comparison of Setups
Deciding on the right setup really comes down to your unique situation—your budget, how often you'll be training models, and your team's size. To help you weigh the options, I've put together a table comparing the most common environments.
| Environment Type | Cost Range | Setup Complexity | Scalability | Best For |
|---|---|---|---|---|
| Cloud (e.g., Colab, SageMaker) | Low initial, high ongoing | Low | High | Individuals, small teams, initial experiments |
| Local Machine (1-2 GPUs) | Medium initial, low ongoing | Medium | Low | Small teams with frequent training needs |
| On-Premise Server | High initial, medium ongoing | High | Medium-High | Larger teams, sensitive data, constant workloads |
This table gives a clear breakdown, showing that a small team running occasional experiments will likely find cloud platforms more economical. In contrast, a larger team with constant training demands might see significant savings with an in-house setup over the long run.
Ultimately, there isn't one "perfect" environment for everyone. The most effective strategy is often a hybrid one. You can use free or low-cost cloud resources for early prototyping and data exploration. Once you're ready for longer, more intensive training runs, you can switch to a more powerful local or on-premise machine. This approach helps you stay nimble and manage costs effectively as you scale up your fine-tuning work.
Creating Datasets That Actually Drive Model Performance
If there's one place where fine-tuning projects quietly go off the rails, it's during dataset preparation. It’s the part everyone seems to rush through, eager to get to the "real" work of training. From my experience, however, this is the single most important phase that separates a model that truly transforms a workflow from one that's a monumental waste of time and compute resources. The secret isn't throwing terabytes of data at the problem; it's meticulously curating a high-quality, relevant dataset.
Think of your base LLM as a brilliant but inexperienced new hire. They have a massive general knowledge base but know nothing about your company's specific processes, style, or customers. Your fine-tuning dataset is their training manual. A sloppy, inconsistent manual will create a confused, ineffective employee. A clear, well-structured manual creates a superstar. This is why data quality consistently trumps sheer data quantity. A few hundred high-quality, hand-crafted examples will often outperform thousands of noisy, generic ones.
Structuring Your Data for Success
So, what does a "high-quality" dataset actually look like? It starts with structure. For most tasks, you’ll be creating prompt-response pairs. For example, if you want to teach a model to summarize customer support tickets, each data point would be:
- Prompt: The full text of a real customer support ticket.
- Response: A perfect, human-written summary that follows your exact desired format and tone.
This structure needs to be ruthlessly consistent. If you want the model to output summaries in Markdown with specific headings, every single example in your dataset must follow that format. Any deviation teaches the model that sloppy outputs are acceptable. It's a classic "garbage in, garbage out" scenario, but on a much more subtle level. This is a key part of learning how to fine tune llm effectively—you are teaching by example, and your examples must be perfect.
Platforms like the Hugging Face Hub are excellent resources for finding pre-existing datasets that you can adapt or use as inspiration for your own structure.
Exploring these datasets can give you practical ideas for how to format your own data for tasks ranging from question-answering to code generation.
The Art of Cleaning and Validation
Once you have your data, the real work begins: cleaning and validation. This is where you hunt down and eliminate inconsistencies, errors, and ambiguities. For a sentiment analysis task, are the labels "positive" and "neutral" truly distinct, or do they overlap? For a code generation task, does every example actually compile and run without errors? These details matter immensely.
A critical, often overlooked step is creating a dedicated validation set. This is a separate, pristine slice of your data (maybe 10-20%) that the model never sees during training. Its sole purpose is to give you an honest, unbiased report card on how well the model is actually learning the task, not just memorizing the training examples. Without a good validation set, you’re flying blind, with no real way to know if your model will perform well on new, unseen data in the real world.
The fine-tuning workflow has become a standard practice for engineering teams. By 2025, it’s a crucial process involving several key stages: choosing a base model, meticulously preparing a well-formatted dataset, picking the right fine-tuning method, training the model, and then rigorously evaluating the results before iterating. Discover more insights into the modern fine-tuning workflow from our friends at Heavybit.
When your dataset is small, you might worry about having enough data. This is where data augmentation comes in handy. It's a technique for creating new training examples from your existing ones. For instance, you could rephrase prompts in different ways or swap out synonyms. This helps the model generalize better without you needing to source entirely new data. For very limited datasets, generating synthetic data with a larger, more powerful model (like GPT-4) can also be a viable strategy to bootstrap your initial training set, which you can then refine by hand.
Navigating Full Fine-Tuning vs. Parameter-Efficient Methods
Once your dataset is prepped and ready to go, you'll hit a fork in the road: how exactly do you plan to teach your model? The decision between full fine-tuning and more modern, parameter-efficient approaches will have a big impact on your project's budget, timeline, and even the quality of the final result. Getting this choice right is a core part of learning how to fine tune LLM in a way that's both effective and practical.
Think of it this way: full fine-tuning is like rewriting an entire textbook just to add one new chapter. To get the new information in there, you have to adjust every single word and sentence—or in our case, every parameter in the model. This method can lead to really deep, specialized knowledge and top-tier performance, but it's a beast in terms of resources. It needs a massive amount of GPU memory and a lot of time, which puts it out of reach for many teams without access to serious hardware.
The Rise of Smarter, Lighter Methods
This is where Parameter-Efficient Fine-Tuning (PEFT) techniques have really changed the game. Instead of rewriting the whole book, PEFT is more like adding well-placed sticky notes and comments in the margins. You freeze the original model's weights (the textbook) and only train a very small, new set of parameters. This approach drastically cuts down on the computational power needed.
One of the most well-known PEFT methods is Low-Rank Adaptation (LoRA). LoRA injects small, trainable "adapter" matrices into the model's architecture while leaving the billions of original weights untouched. Since you're only training these tiny adapters, the memory requirements drop significantly. Suddenly, you can fine-tune large models on a single consumer-grade GPU—something that was just a dream with full fine-tuning.
To give you a better idea, let's take a look at a comparison of these fine-tuning methods. The table below breaks down the key differences in memory usage, training time, performance, and ideal use cases.
Fine-Tuning Method Comparison
A detailed comparison of different fine-tuning approaches including full fine-tuning, LoRA, QLoRA, and other parameter-efficient methods.
| Method | Memory Usage | Training Time | Performance | Use Cases |
|---|---|---|---|---|
| Full Fine-Tuning | Very High | Very Long | Potentially Highest | When maximum performance is critical and resources are not a constraint. Ideal for creating state-of-the-art specialized models. |
| LoRA | Low | Fast | High (Often near full fine-tuning) | General-purpose fine-tuning on consumer hardware; balancing performance and efficiency for custom tasks like chatbots or summarizers. |
| QLoRA | Very Low | Very Fast | Good (Slight trade-off for efficiency) | Fine-tuning very large models on limited hardware (e.g., single GPU); perfect for experimentation and development on a budget. |
| Other PEFT | Low-Medium | Fast-Medium | Varies | Used for specific needs like instruction-following or when targeting particular model layers for updates. |
As you can see, methods like LoRA and QLoRA offer a much more accessible path to custom models without a huge sacrifice in performance. They represent a practical compromise for most real-world applications.
Pushing Efficiency Even Further with Quantization
Taking this a step further, methods like QLoRA (Quantized Low-Rank Adaptation) mix LoRA with a technique called quantization. Quantization is the process of reducing the precision of the model's weights—for example, converting them from 16-bit numbers to 4-bit numbers. This simple change dramatically cuts down on memory usage. By applying LoRA to an already quantized model, QLoRA lets you fine-tune even the biggest models on surprisingly modest hardware.
These technical developments show just how much more efficient fine-tuning has become. Tools like QLoRA, Spectrum, and Flash Attention are now standard for speeding up the process while lowering the hardware barrier. If you're keen to stay on top of the latest trends, you can discover more insights about fine-tuning in 2025 on philschmid.de.
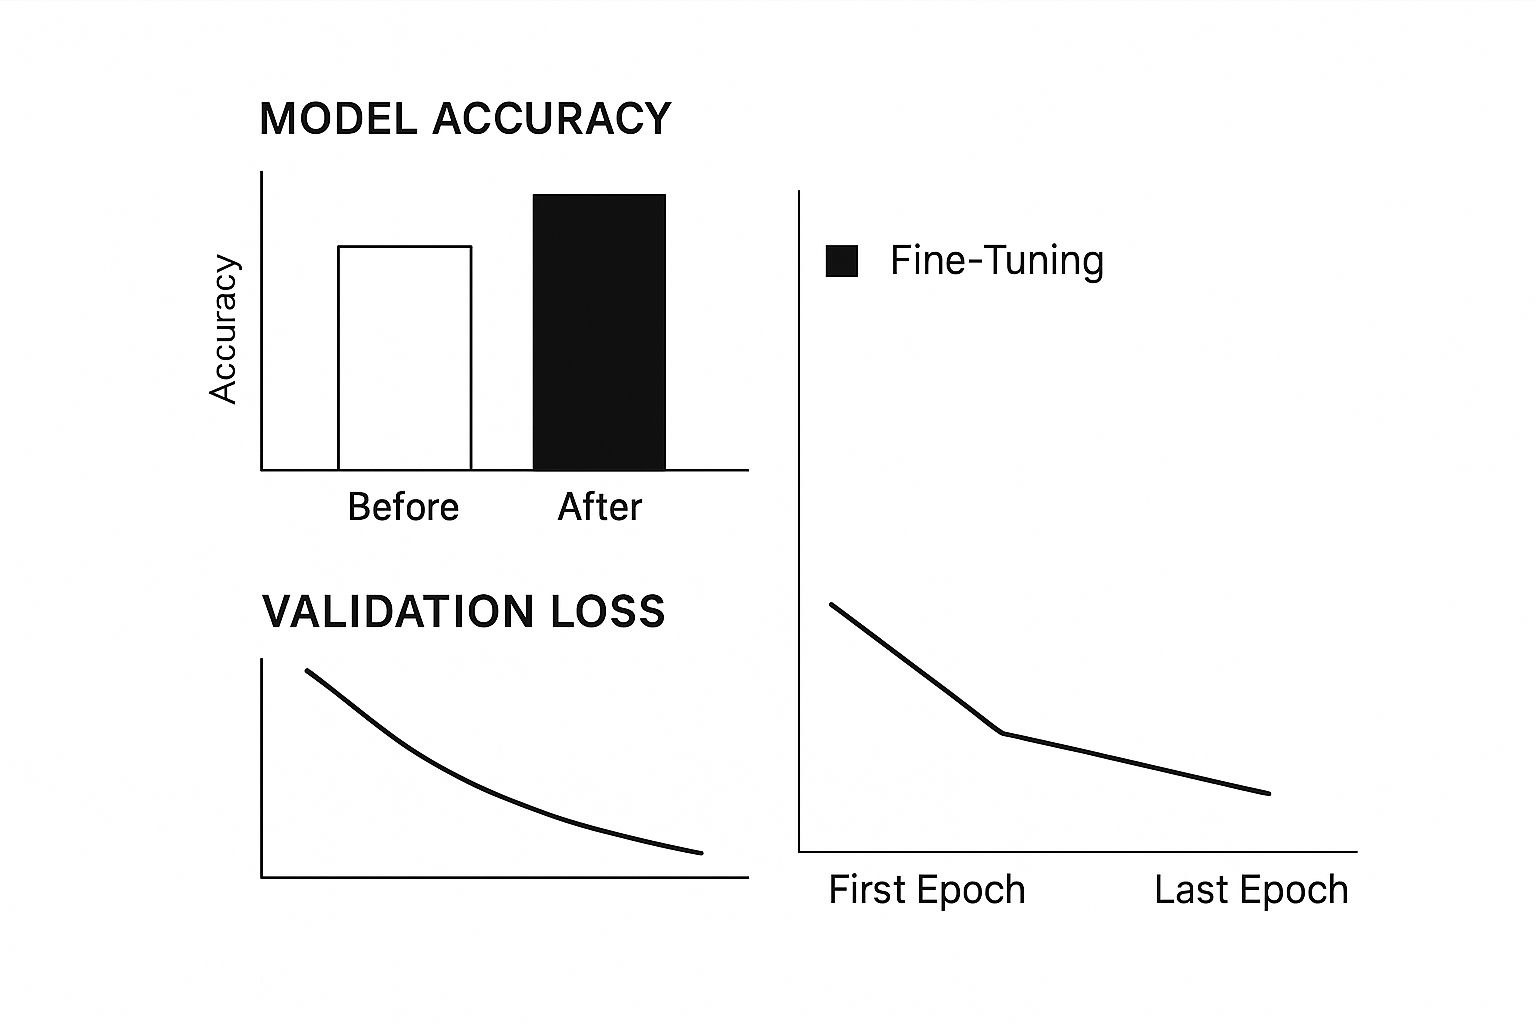
The infographic below shows the typical effect that fine-tuning has on a model's performance. You can see a clear rise in accuracy and a drop in validation loss, which tells us the model is successfully learning from the new, specialized data.
Ultimately, picking the right method comes down to a careful balance between the performance you need and the resources you have. It's a critical decision that we explore in more detail in our guide to LLM evaluation metrics.
Taming Hyperparameters With Systematic Approaches
Jumping into hyperparameter tuning can feel like you're just guessing in the dark. You might change a learning rate here, adjust a batch size there, and cross your fingers. But there's a much more organized way to handle this crucial part of learning how to fine tune an LLM, saving you from endless trial-and-error and costly compute time. It all begins with understanding which settings really make a difference.
For most fine-tuning projects, especially when using parameter-efficient methods like LoRA, a small set of hyperparameters does most of the work. The learning rate is often the single most critical setting. If you set it too high, your model’s training can become unstable, causing the loss to jump around erratically. If it's too low, training will move at a snail's pace, or worse, the model might get stuck and fail to learn anything meaningful.
From Manual Guesswork to Automated Searches
Instead of tweaking these values by hand after each run, a much better strategy is to use a systematic hyperparameter search, commonly known as a "sweep." This involves defining a range of possible values for your key parameters and letting an automated tool run experiments for you, tracking how each combination performs. This isn't just a technique for big research labs; tools like Weights & Biases (W&B) Sweeps make it accessible for everyone.
An automated sweep lets you methodically explore which combination of hyperparameters produces the best results, such as the lowest validation loss, without manual intervention.
For fine-tuning, you should concentrate your sweeps on a few key parameters:
- Learning Rate: As mentioned, this is usually the most impactful. A good starting range to test for the AdamW optimizer is between 1e-5 and 5e-4.
- Batch Size: This choice is heavily influenced by your GPU memory. While larger batches can result in more stable training, smaller ones sometimes lead to better generalization. It's worth testing values like 4, 8, or 16.
- Number of Epochs: This determines how many times the model sees the entire dataset. With too few epochs, it underfits; with too many, it overfits. For fine-tuning, 1 to 5 epochs is typically a solid range to explore.
Advanced Strategies for Better Optimization
Once you've got the basics down, you can introduce more advanced strategies. A learning rate scheduler, for example, is a very effective technique. A popular choice is a "cosine" schedule paired with a "warmup" period. This means the learning rate starts low, ramps up to its maximum value during the initial phase of training (the warmup), and then gradually decreases. This approach helps stabilize the model early on and allows for more delicate weight adjustments near the end of training.
Another pro-tip is to keep a close eye on overfitting. This happens when your training loss continues to decrease, but your validation loss starts to creep up. It's a sign that the model is just memorizing your training data instead of learning to generalize. This is where concepts like the bias-variance tradeoff become relevant. A model with high variance is overfitting, and you might need to stop training earlier or introduce regularization. To better understand how this balance impacts model performance, you can check out our comprehensive guide on the bias-variance tradeoff.
By using these systematic approaches, you can turn hyperparameter tuning from a frustrating guessing game into a repeatable, scientific process that consistently produces better-performing models.
Managing Your Training Process From Launch to Completion
With your data prepped and hyperparameters chosen, it's time to kick off the training job. This isn't a "set it and forget it" situation. You need to actively watch over your model as it learns, and your mission control for this is the monitoring dashboard. This gives you a live window into how the fine-tuning is progressing.
These dashboards track vital metrics, but the two you'll be glued to are training loss and validation loss. Training loss tells you how well the model is learning from the data you provided. Validation loss, on the other hand, shows its performance on data it hasn't seen before. The sweet spot is when both of these curves are steadily heading down, which signals that your model is learning general patterns, not just memorizing the training set.
Interpreting Your Training Curves
Being able to read the story your loss curves are telling is a key skill. They give you immediate feedback on the health of your training run. Tools like TensorBoard or Weights & Biases are indispensable for this, as they visualize these metrics and help you catch problems before you burn through precious time and GPU budget.
Here’s a snapshot of what these curves look like in a real dashboard.
This image is a textbook case of overfitting. Notice how the training loss (orange) keeps dropping, but the validation loss (blue) has started to creep back up. This divergence is a clear red flag. It means the model has stopped learning useful patterns and is now just memorizing the training examples. When you see this, it's usually the right moment to stop the training.
Checkpoint Management and Handling Interruptions
Fine-tuning runs, especially long ones, can be surprisingly fragile. A random network hiccup, a cloud instance getting preempted, or a small bug in your code can bring everything to a halt. This is precisely why checkpointing is a non-negotiable part of the process. Checkpointing is simply saving the model's complete state—its weights, optimizer status, and learning rate—at regular intervals, like after each epoch.
Proper checkpointing gives you two major advantages:
- Resilience: If your run crashes, you don’t lose everything. You can pick up right where you left off from the last saved checkpoint, potentially saving you hours or even days of work.
- Model Selection: It lets you hold onto the model from the epoch that had the best validation score, not just the one from the very end. This "best" model is often far more capable than the final one, particularly if overfitting kicked in during the later stages.
By actively managing your training—watching metrics to catch issues like overfitting, saving checkpoints to build resilience, and making informed decisions on when to pull the plug—you turn fine-tuning from a shot in the dark into a controlled experiment. This hands-on management is what separates a successful fine-tuning project from a costly failure.
Testing and Deploying Models That Perform in the Real World
Seeing a beautiful, downward-sloping validation loss curve is a great feeling, but it’s just a milestone, not the finish line. The real test for your fine-tuned LLM begins when it faces the unpredictable nature of real-world data and user inputs. Success in production means shifting your focus from clean metrics to practical, human-centered evaluation.
This is about more than just accuracy scores. You need to understand how the model behaves in scenarios it was never explicitly trained on. A great way to do this is by creating a "challenge set" of prompts. This isn't your pristine validation data; it’s a collection of the toughest, weirdest, and most adversarial inputs you can think of.
- Test for robustness by throwing in typos, slang, and grammatically messy sentences.
- Check for bias by using prompts that might trigger stereotyped or unfair answers.
- Evaluate its ability to follow complex instructions with prompts that have multiple parts or constraints.
The insights from this challenge set can be humbling, but they are incredibly valuable. They reveal the model's true weak spots before your users discover them for you.
From Evaluation to Production
Once your model clears these qualitative hurdles, the next big step is deployment. This isn’t just about putting your model behind an API endpoint. It's about creating a solid system for management, monitoring, and future improvements. This is where model versioning tools become absolutely essential. You need a dependable way to track different fine-tuned model versions, the datasets they were trained on, and their performance metrics.
For example, frameworks like MLflow offer a structured way to log, register, and serve models. This is crucial for keeping things organized as you experiment and iterate.
The screenshot above shows the MLflow Model Registry UI, where you can see different model versions tracked with stages like "Staging" and "Production." This organized approach is fundamental for reliable deployment. It lets you quickly roll back to a previous version if a new one doesn't perform as expected. A good registry ensures you always know which model is serving users and can trace its entire history.
A popular deployment strategy is A/B testing. Here, you direct a small fraction of user traffic to your new fine-tuned model, while the rest continues to use the old one. This lets you compare performance on live data and gather real-world feedback on which model truly delivers better results. You can also implement simple feedback loops, like a "thumbs up/thumbs down" button, to collect direct user data that can be used for future fine-tuning cycles. To learn more about the entire process, check out our detailed guide on how to fine-tune LLMs.
Ongoing maintenance, like periodically retraining your model on new data, is key to making sure its performance doesn't degrade over time. This protects your investment and ensures it continues to provide value.
At DATA-NIZANT, we break down complex AI topics to give you the practical knowledge needed for real-world success. Explore our expert-authored articles and analyses to stay current in the fields of AI and machine learning.

